
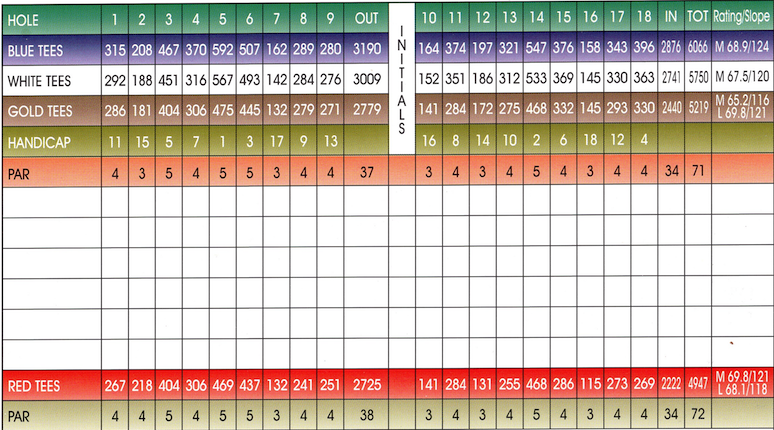
Scorecard
Hole-by-Hole Description
The Front Nine
Hole #1: The ideal drive on this par four is down the left side of the fairway. This will open the green to a short second shot. Fairway bunkers are situated on the left and right hand sides. A bunker also guards the right side of the green. Better to miss short than long on this green. (Blue: 315 yards, White 292 yards, Red 286 yards)
Hole #2: The longest par three on the course and it plays longer than the yardage indicates. The tee shot is uphill to a narrow, severely sloped green. (Blue: 208 yards, White 184 yards, Red 218 yards [par four])
Hole #3: A par five that is reachable in two for the long hitter. Pine trees line the driving area left and right. A large tree guards the left side of the green and bunkers flank the front, both left and right, of this back to front sloping green. (Blue: 467 yards, White 451 yards, Red 404 yards)
Hole #4 Out of bounds is tight to the left of this fairway. With trees down the right side, this can be an intimidating tee shot. The second shot on this par four must be played to a small green with a bunker to the left. (Blue: 370 yards, White 316 yards, Red 306 yards)
Hole #5 This is the longest hole on the course, and again there is out of bounds down the left side of this par five. Even with two good shots the player is usually left with a fairly long third shot to the flattest green on the course. (Blue: 592 yards, White 567 yards, Red 472 yards)
Hole #6 Another par five that may be reachable in two, under favorable conditions, for the longer hitters. The driving area of this fairway is also lined with trees left and right. The third shot is played uphill to a back to front sloping green that is guarded by three bunkers. (Blue: 507 yards, White 493 yards, Red 441 yards)
Hole #7 A par three that requires a short to middle iron from the tee to a relatively flat green. An elevated bunker will catch shots hit to the right of this green, making for a difficult up and down. (Blue: 162 yards, White 142 yards, Red 132 yards)
Hole #8 The tee shot to this short par four is played downhill, and there is a pond to the right of the fairway. Players may elect to lay up on the tee shot in order to get a level lie for the second shot. The short second shot is uphill to a back to front sloping green. A bunker guards the front left corner of the putting surface. (Blue: 289 yards, White 284 yards, Red 279 yards)
Hole #9 The inward nine closes with another short par four that plays uphill all the way to the green. Trees line both sides of the fairway and a pair of bunkers may come into play on the tee shot. The second shot is played uphill to yet another back to front sloping green. (Blue: 280 yards, White 276 yards, Red 271 yards)
The Back Nine
Hole #10 This par three plays longer than the yardage indicates, especially if the pin is placed behind the bunker that guards the front right side of the green. (Blue: 164 yards, White 152 yards, Red 141 yards)
Hole #11 A downhill tee shot to this par four should favor the right side of the fairway. A tee shot played to the left may be blocked by a tree at the bottom of the hill. An uphill second shot is played to a green that slopes from left to right. An approach that misses right may find trees and left may find a bunker. (Blue: 374 yards, White 351 yards, Red 284 yards)
Hole #12 An uphill par three that requires anything from a medium iron to a wood, depending on the wind. The right side of the green is protected by a bunker and a miss to the left will leave the player with an uphill chip from heavy rough. (Blue: 197 yards, White 186 yards, Red 164 yards)
Hole #13 Out of bounds protects the left side of this par four and trees line the right side of this right to left sloping fairway. The left side of the fairway is the ideal place to play the uphill second shot. The green is one of the most severely sloped on the course. (Blue: 321 yards, White 312 yards, Red 255 yards)
Hole #14 This is the only par five on the back nine and it again features out of bounds to the left. Big hitters may try to cut off some of this dog leg left hole, but they will risk out of bounds and trees. The safe tee shot is played at a red barn seen in the distance from the tee. The second shot is played to a left to right sloping fairway, making for a difficult third shot to a green guarded both left and right by bunkers. (Blue: 547 yards, White 533 yards, Red 468 yards)
Hole #15 A dogleg right par four, this tee shot should be played down the right side of the fairway. The right to left slope of the fairway can make the second shot longer. The uphill second shot is played to a green guarded by a bunker on the front right side. (Blue: 376 yards, White 369 yards, Red 332 yards)
Hole #16 If the wind is at your back on this downhill par three, it could be a short iron shot, if it is in your face you will need two or three more clubs. A bunker guards the front of the green and getting up and down from behind or left of the green is difficult. (Blue: 158 yards, White 145 yards, Red 115 yards)
Hole #17 An ideal drive on this dogleg left par four should be long and favor the right side of the fairway. Drives played too far to the left may be blocked by trees or obscure the view of the green. The relatively short second shot will be played to a green that is guarded on both sides by bunkers. (Blue: 343 yards, White 330 yards, Red 293 yards)
Hole #18 The closing hole is an uphill par four and is the longest par four on the course. Only the longest hitters will be able to see the green for their approach shots. The green slopes gently from back to front. A miss to the left will leave an uphill chip from heavy rough. (Blue: 396 yards, White 363 yards, Red 330 yards)